|
Dangology
Takeuchi Speaks!FAQ Shrine History Historical Dango Moments Study Dango in BSSM Reasons to Wear Real Examples Quiz Links Out Dango Atama
Usagi/Sailormoon:
Method 1(2ft for bun) Chibiusa/Chibimoon: Method 1 (3ft for bun) Chibichibi/Pink Kitten: Method 1 (3ft for bun) Method 2 (3ft for bun) Kousagi: See Shrine Edible
Recipe
Copyright
This site copyright 2007. Written content belongs to Hitsuji, layout by Mako-chan. Sailormoon is copyright all associated companies and the creator (of course), Takeuchi Naoko.
|
|
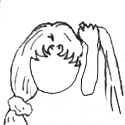
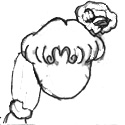
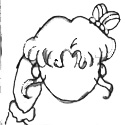
Chibichibi's dango: Version 1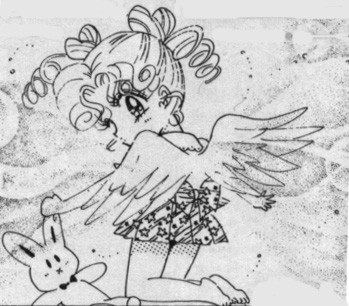 Chibichibichibichibichibichibichibichibichibichibi CHIBI! Nani yo ka. [What was that?] Where are you going? Fine, fine.. go and eat sweets.. you know Usagi isn't going to be too happy if you don't give her some as well. I'm sorry you can't stay and help out. Chibichibi is hard to decide what color to dye your hair.. if you are doing Sailor Cosmos then it's easy because it's white.. but with Chibichibi it depends on the version. In the anime it's almost red, in the manga it's a dark pink.. I guess you'll have to decide, either way note that the bangs are not the same nor is the ear thing. By the way.. I wouldn't really force a little kid to do this.. ^^;; afterall a girl with pink hair is not exactly popular in the kindergarden playground.. READ ALL DIRECTIONS THOROUGHLY BEFORE YOU TRY THIS OUT! Note: I scanned the pic above and altered it. . You can take it if you want, but I guarentee the original is far better. Tip: Try Usagi's version 2 first! Also Read the Dango FAQ and e-mail guidelines before e-mailing me questions. (It's in your best interest.) Materials -You need a comb (or a brush) -four elastics (or you can substitute two scrunchies in the place of two elastics, or a lot of hair pins in the place of all the elastics, if your a purist) -(optional): decoration You and your hair just past sholders (2.5-3ft approximately) of hair P.S. I will not take the responsibility dyeing expenses for this project. I tells ya your on your own. In fact I caution you to be careful in doing this. ^.-
1. To do this Chibichibi allowed me to take a picture.. but she got hungry and wandered off. But she does reccomend gathering your materials as listed above. (I think that's what she meant)
2. If your hair is not parted exactly in the middle of you head, do so now. Then continue that line to the back of your head. You can either hold one side of your hair and wait for the next instruction, OR you could use a scrunchie, or hair elastic.
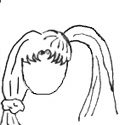
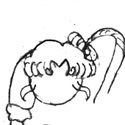
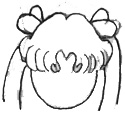
3. gather your hair into a high ponytail on the top of your head. It should be positioned on the point where your skull curves slightly and a bit back of middle if you were looking at the side of your head (or look at a picture of Chibichibi to get a better sense of where it should be) It shouldn't be a problem when lying down either. Make sure it's close to your skull as possible, and the back of your hair doesn't make that nasty arch ('cause it's a pain to fix later).
4. Now you have a choice to make (see told ya!) purist or non-purist. It's like to be and not to be question. If you go non-purist it stays longer. If you aren't going to do it purist or just want to appear purist you can put in a hair elastic. Make sure its tight as possible around the hair and next to your head. The tighter it is, the less chance your dango will flop. If you are a purist hang in there.
5. This is the tricky part. It's best to look at the picture to see how this works. Think of a person behind you (doesn't matter who, as long as you don't imagine someone that will make your work fall apart) I know this sounds strange, but it will help out in the end. If you twist it wrong you have to go back to instruction 3, which is a pain, you cannot imagine... Now twist your hair towards your imaginary person. The more you twist your hair (i.e. the tighter you make the twist) the better your dango-atama will be. It's best to start at the base of your head, especially for those purists out there (actually the purist must do this and it might be a good idea if you started it with the hand you aren't holding the hair with before twisting.)
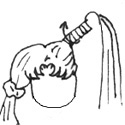
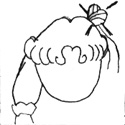
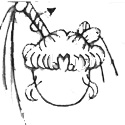
6. I hope that wasn't too painful. OK! Now to make them unique.. this is very tricky, maybe more so than the Chibiusa ones. If you can't get this method try the other one. and then practice. What you do is establish a second bun right next to the first one by twisting the hair back on itself. If you have long hair you can twist it a few times to establish it. (see picture) this will give the basic structure of a chibichibi dango! ^_^ heart shaped.
7. Now wrap the hair over the front of the structure so it looks like the picture.
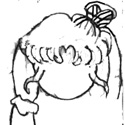
8. The extra hair should come from the back (see picture). Secure the dango with hair pins, scrunchie, or any other thing you see fit.
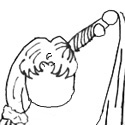
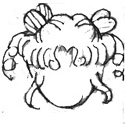
9. Warm up the curling iron. Repeat instructions for the Chibichibi dango with other side. Remember the hair twists in the opposite direction as before.
10. Curl the ends of the hair so it matches that of the top picture. make sure they are twisting in the right direction.
11.Now you can go around and tug on people's arms and say Chibichibichibi and repeat their last lines and expect treats.
Takeuchi-Naoko.com
/ Celestial Luminary
/ Moon Luminosity
/ Moon Orbit
/ Moon Dango
Disclaimer: Bishoujo Senshi Sailormoon (and Sailor Moon), is copyright of
Takeuchi Naoko, Nakayoshi, Kodansha Inc., Toei Entertainment, Asahi TV, Bandai, Mixx Entertainment Inc., DiC, Irwin, Pioneer, Optimum Productions and Cloverway Inc.. I happen to love Bishoujo Senshi Sailor Moon and in no way want to infringe or unlawfully profit from Sailor Moon. Oh, and Princess Takeuchi Naoko is great! Thank you Takeuchi-sensei for creating Bishoujo Senshi Sailor Moon! Anybody out there have that in Japanese?
The drawings are mine. You may not take without permission.
|